Busy weeknights demand fast, satisfying meals—and nothing hits the mark like chicken tenders paired with pasta. From creamy Parmesan sauces to crispy breaded chicken or lighter garlic-and-oil pasta, this versatile pairing works for every taste and skill level.
Whether feeding picky kids, hungry teens, or a full family after a long day, these recipes are fast, family-friendly, and flavorful.
Why Chicken Tenders Are Perfect for Pasta Dinners
Faster Cooking: Tenders cook quicker than whole chicken breasts.
No Marinating or Pounding Needed: Save prep time without compromising flavor.
Naturally Tender: Even if slightly overcooked, they stay juicy.
Evenly Sized Bites: Perfect for mixing with pasta and sauce.
Every bite delivers balanced protein and carbs, keeping dinners wholesome and filling.
Recipe 1: One-Pot Creamy Parmesan Chicken Pasta
A restaurant-style pasta, rich and comforting—all in one pot.
Ingredients:
1 lb chicken tenders, seasoned with Italian seasoning, salt & pepper
8 oz short pasta (penne, rigatoni, or shells)
2 cups chicken broth
¾ cup half-and-half
1 cup freshly grated Parmesan cheese
4 garlic cloves, minced
1 small yellow onion, diced
2 tbsp butter + olive oil
Instructions:
Brown chicken in butter and oil (4–5 min per side), then remove.
Sauté onion until soft, add garlic 30 sec.
Deglaze pan with chicken broth, scraping browned bits.
Fry in olive oil 5–6 min per side (internal temp 165°F).
Serve over angel hair pasta tossed with olive oil, garlic, and red pepper flakes.
Recipe 3: Air Fryer Chicken Tenders with Marinara Pasta
Crispy chicken without deep frying.
Toss chicken with olive oil, Parmesan, garlic powder, oregano, salt, and pepper.
Air fry at 400°F for 12 min, flipping halfway.
Serve over pasta with warm marinara sauce, garnish with basil and extra Parmesan.
Recipe 4: White Wine Garlic Chicken Pasta (Light & Creamy)
A lighter alternative to Alfredo with bright garlic and wine flavors.
Sear chicken, remove.
Sauté garlic in butter + olive oil.
Whisk in flour, add white wine (reduce by half), gradually add chicken broth.
Simmer 5–8 min, add ⅓ cup cream and lemon juice. Toss with farfalle or spaghetti and top with chicken.
Choosing the Right Pasta Shape
Sauce Type
Best Pasta
Avoid
Creamy/Chunky
Penne, Rigatoni, Farfalle
Tiny pasta like orzo
Oil-Based
Angel Hair, Thin Spaghetti
Large chicken chunks
Meal Prep & Storage Tips
Bread uncooked tenders up to 24 hrs in advance.
Freeze breaded tenders for 3 months.
Cooked chicken lasts 4 days in fridge.
Common Problems & Solutions
Dry chicken: Cook on medium-high, remove at 165°F.
Soggy breading: Avoid overcrowding pan; cook in batches.
Watery sauce: Add pasta water gradually.
Bland flavor: Season chicken, pasta water, and sauce properly.
FAQs
Can I use frozen chicken tenders? Yes, thaw fully and pat dry. Can I substitute chicken breasts? Cut into 1-inch strips; monitor cooking time. What wine works best? Dry whites like Pinot Grigio or Sauvignon Blanc. Can I make it gluten-free? Use gluten-free pasta and almond flour/GF breadcrumbs.
What to Serve on the Side
Caesar salad or arugula salad with lemon vinaigrette
Roasted broccoli, asparagus, or Brussels sprouts
Garlic bread for larger gatherings
Final Thoughts
Chicken tenders with pasta are fast, easy, and family-approved. With smart techniques, flavorful sauces, and simple shortcuts, you can serve dinner that beats takeout every time, keeping prep minimal and taste maximum.
Introduction: Why butternut squash in the microwave is a game changer.
To be honest, most people love eating butternut squash more than cooking it. It’s delicious, comforting and incredibly versatile, but it takes a lot of hard work just to prepare it. Peel, chop, roast, wait… and wait a little longer. That’s why learning to cook butternut squash in the microwave can completely change your relationship with this simple vegetable.
Cooking butternut squash in the microwave does not mean taking shortcuts in the wrong way. It means cooking in a smarter way. When done correctly, the microwave gives a soft, evenly cooked squash in a much shorter time than it takes in the oven. No preheating, no need to look at the tray over and over again, and no need to wonder if it’s cooked. Just fast, reliable results that fit into real life – Busy weekdays, early lunches, and last-minute dinners are also included.
Most people are surprised to learn how delicious microwaved butternut squash really is. Its natural sweetness increases, the texture becomes silky and soft, and it is ready to be seasoned to your liking. Whether you want mashed squash, cubes for a salad, or a base for a soup, the microwave handles it with ease.
This guide will tell you everything… From choosing the right squash to cutting it safely, cooking it properly and using it in real food. If you’ve ever ignored butternut squash because it seemed too laborious, this is your chance to bring it back to your kitchen with confidence.
Understanding Butternut Squash
What is butternut squash and why it is so popular.
Butternut squash is a winter squash with smooth, light brown skin and bright orange pulp. Its shape – long neck and round bulb at the bottom – makes it easy to recognize, even if you are new to cooking. Inside, you’ll find a small seed portion, which means it has more edible pulp than many other squashes.
Its popularity depends on three things: Taste, versatility and nutrition. Butternut squash has a naturally sweet, nut-like flavor that works equally well in both savory dishes and sweet recipes. It combines very well with spices, herbs, cheese, cereals and proteins, making it a favorite in all cuisines.
Another reason why it’s so popular is how easy it is. You can roast it, boil it, mash it, add it to soup, or – yes – microwave it, and it still tastes great. This easily adaptable feature makes it a must-have in many kitchens, especially in the fall and winter.
Taste, texture and use in cooking
When it is properly cooked, butternut squash becomes soft and almost creamy. Its texture is smooth, not fibrous, which is why it is often used as a base for soups and purees. Its mild sweetness is enhanced by heat, especially when it is cooked evenly, as in the microwave.
In cooking, butternut squash is everywhere. It is used in pasta sauces, grain bowls, curries, risottos and even desserts. Microwaving it opens the door to all of these uses, without taking too long, making it easier to eat more often.
Why you should use a microwave to cook butternut squash
The biggest advantage of using a microwave is speed. The work that takes 45 minutes in the oven can be done in just 8 to 12 minutes in the microwave, depending on the size and cut. That’s not a small difference… That’s why dinner is made on time.
It doesn’t just save a few minutes; It also saves energy and mental effort. It does not require preheating, does not have to be checked in the middle, and there is no risk of burning the edges while the middle part remains hard.
Energy Efficiency and Facilities
Microwaves use much less energy than ovens, especially for small to medium portions. If you’re cooking for one or two people, it’s often useless to turn on a full-size oven. The microwave solves this problem instantly.
It’s also great for hot weather when you don’t want to heat up your kitchen. You get comfortable food without overheating.
Microwave vs oven vs stovetop
Each method has its place, but the microwave is best in simplicity. Ovens are great for caramelization, for stovetop control, but the microwave works best when you need fast, consistent softening. For recipes that require mashed or blended squash, microwaving is often the best first step.
Choosing the right butternut squash
size, shape and ripening
Choose a squash that is heavy for your size, and has matte (not shiny) skin. The color should be the same, without deep cuts or soft spots. Medium sized squashes are best for microwave. They cook better and fit easily in microwave-safe utensils.
Whole vs chopped squash
Whole squash is often cheaper and stays fresh longer, but chopped squash is a great way to save time. Both work well in the microwave, you just have to adjust the cooking time accordingly.
Preparing butternut squash for microwave
washing and cleaning
Always wash the squash, even if you plan to peel it. The dirt on the skin can get into the pulp during cutting.
peeling or not peeling
The skin is hard and doesn’t feel good to eat, but if you’re microwaving half the squash and later extracting the pulp, you can skip the peeling altogether.
Cutting safely and efficiently
Use a sharp knife and first stabilize the squash by cutting both ends. All of this makes it easier and safer.
How to cook whole butternut squash in the microwave
Cooking whole butternut squash in the microwave seems almost too easy, but this is one of the most practical ways – Especially if you want a soft pulp for mashing, puree or soup. The main thing is to understand how the steam inside the microwave works and let it do its work.
Step-by-step instructions
First, rinse thoroughly and dry. Using a fork or the tip of a knife, carefully poke holes around on the squash – especially around the neck and bulbs. This step is very important. These holes allow the steam to escape and prevent pressure from building up inside.
Place the squash in a microwave-safe plate or shallow dish. Run the microwave on high for 10 minutes, then turn it carefully using oven mitts or towels. Continue to cook at 3-5 minute intervals until the squash is soft. The total time usually ranges from 15 to 20 minutes, depending on the size and the power of the microwave.
Cooking time and power
Most home microwaves are between 900 and 1200 watts. If your microwave is more powerful, reduce the cooking time a bit and check more often. You need a squash that presses easily, especially on the thickest part.
How do you know it’s stuck
Put the knife in the neck of the squash. If it goes in without much interruption, it’s ready. Let the squash cool for 5 minutes before cutting… It will be very hot inside. After it cools a little, cut it, remove the seeds and extract the pulp.
How to cook sliced butternut squash in a microwave oven
Slices of chopped butternut squash are ideal for salads, bowls and side dishes. Microwaving the pieces gives you control over the texture, while the preparation remains easy and quick.
The size of the best piece
Aim to cut pieces of about 3 ⁄ 4 to 1 inch. Small pieces cook quickly but can be soft, while larger pieces can cook unevenly. A uniform size is more important than an accurate measurement. A similar size ensures even cooking.
Steam Cooking vs Dry Cooking
Place the pieces in a microwave-safe bowl and add 2-3 tablespoons of water. Cover lightly with a microwave-safe lid or plate to keep steam in. This method of cooking with steam keeps the squash moist and soft. If you like a slightly harder texture, use less water and leave the lid slightly open. This will allow some moisture to escape, but will not cause dryness.
Texture Control Tips
Place on high in the microwave for 5 minutes, run, then continue to cook at 2-minute intervals until softened. Let the squash rest for a minute before serving. With the redistribution of steam, it becomes a little more soft.
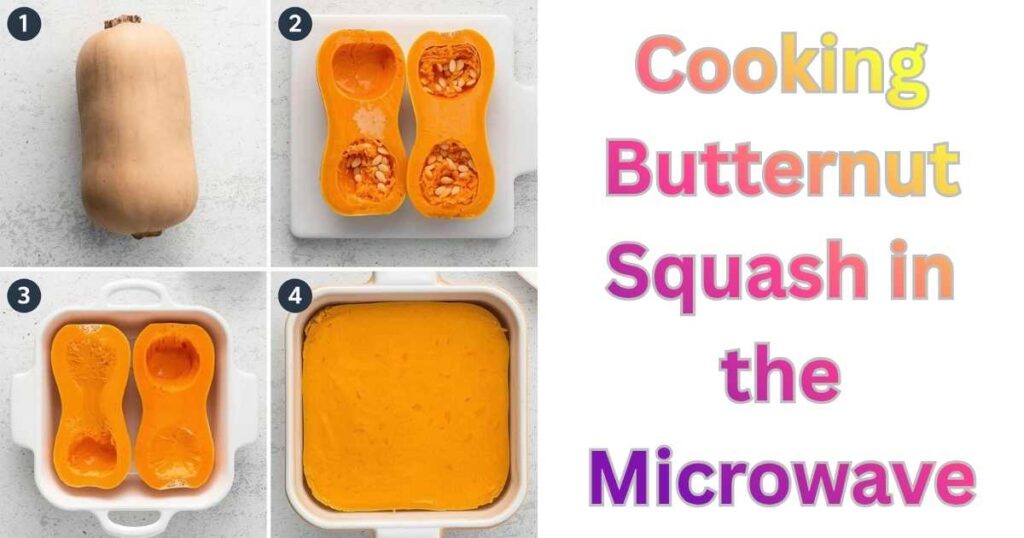
How to cook half a butternut squash in a microwave oven
A good way is to halve the butternut squash before microwaving. It cooks faster than whole squash and takes less preparation than cutting into cubes.
Removing seeds
Cut the squash lengthwise and scoop out the seeds. Don’t worry about going too deep… The pulp near the seed also becomes soft like the rest of the part.
Cooking upright or upside down
Place the halved portions in a microwave-safe dish with a few tablespoons of water. This creates a steam pocket that cooks the squash evenly and efficiently.
The same cooking technique
Place on high in the microwave for 8-10 minutes, then check for softness. Cook for 2-3 minutes, if needed. Once cooked, keep it for a while before turning over and adding the masala.
Seasoning the butternut squash after microwaving
The biggest advantage of microwaving is that it gives you a blank canvas. Squash turns out soft and naturally sweet, ready to adopt your favorite flavor.
Sweet combination
For a cozy, relaxing atmosphere, add butter or olive oil, a pinch of cinnamon, and a little maple syrup or honey. It works great as a side dish or a breakfast style bowl.
Salty and spicy options
Salt, pepper, garlic powder, and smoked paprika instantly turn the microwaved squash into a delicious staple. Add herbs such as thyme or rosemary for extra flavor.
Simple everyday spices
Sometimes it’s less. A little salt and olive oil can be enough to refine the natural flavor.
Common Microwave Cooking Mistakes to Avoid
Overcooked squash becomes watery and tasteless. Undercooked squash remains hard and chock-like. Solution? Cook for a while and check again.
Problems with uneven heating
Always rotate the dish or shake the cubes in between while cooking. Microwaves heat unevenly, and shaking helps to balance it out.
Let go of the time of rest
Relaxing re-distributes the steam, thereby improving the texture. Even a minute makes a noticeable difference.
Microwave Cooking Time Chart
Cut Style Estimated Time
Whole squash 15-20 minutes
Half squash 10-15 minutes
Squash cut into cubes 7-12 minutes
The time can vary according to the power of the microwave and the size of the squash, so use this as a guide, not as a rule book.
Soup and puree
using microwaved butternut squash in the recipe
Microwaved squash is easily available in soups. Add broth, spices, and a little cream or coconut milk, and in a few minutes you will have a comforting meal ready.
Salad and bowl
Cubes or slices look great in cereal bowls and salads. They add sweetness, color and flavor without any additional cooking steps.
Side dish and mash
Mash the squash with butter or olive oil for a quick side dish that goes well with almost anything.
Nutritional benefits of butternut squash
vitamins and minerals
Butternut squash is rich in vitamin A, vitamin C, potassium and magnesium – these nutrients support immunity and overall health.
Fibre and antioxidants
Its fiber content aids in digestion, while antioxidants help protect cells from damage.
Low-calorie, high-nutrient foods
You get a lot of taste and nutrition without too many calories, making it a smart addition to a balanced meal.
Storing and Reheating Microwaved Butternut Squash
Refrigeration Tips
Store the cooked squash in an airtight container in the fridge for up to 4 days.
Instructions for freezing
Before freezing, mash the squash or cut into cubes. It is good for 3 months.
The best way to re-heat
To bring moisture back, add a little water, cover loosely and reheat in the microwave.
Conclusion: Learn to make microwave butternut squash with confidence.
Cooking butternut squash in the microwave removes the biggest barrier between you and this nutritious, delicious vegetable: time. Once you know the basics, it becomes your habit – fast, reliable, and surprisingly satisfying. Whether you’re prepping a meal, cooking for one person, or just want to make dinner quickly, this method deserves a firm place in your kitchen routine.
Frequently Asked Questions
Is it healthy to cook butternut squash in the microwave? Yes. Microwaving retains nutrients and requires little or no fat.
Can I microwave frozen butternut squash? Absolutely. Just increase the cooking time a little and run once in between.
Do I need to peel the butternut squash before microwaving? Only when you are cutting it into cubes. Half and whole squash can be peeled off after cooking.
Why did my squash become watery? This happens when you cook too much or add too much water.
Can I microwave butternut squash for baby food? Yes. This is one of the easiest and smoothest options for puree.